Here is the raw footage from my recent filming of Mollie in the garden miming certain lyrics of the song in different locations of her garden. I also filmed some sparkler scenes which are included below. I decided to put all the footage I recorded and am using into a music video itself for just this scene. I didn't spend hours on it so the lip syncing isn't perfect but you can see a rough idea of the look and style I am aiming for.
Thursday, 24 October 2013
Lighting is Key
 On Monday I began to film my footage for my music video and came to an obstacle that I assume everyone will face if they are shooting outside and especially if they are shooting at night time.
Without the perfect lighting - video quality is reduced massively due to the aperture soaking up all the light in the shot. As all the light is being soaked up and you can see the shot - the image quality gets reduced as a result of this.
 To avoid this happening, if shooting at night you need bright lights facing where you are filming (unless you want the low key, muffled footage) For mine I used the garden flood light which worked pretty well but it wasn't portable so a movable one is more practical.
As you can see from the screenshots of the different lighting - one has a much grainer, blurry effect compared to the crisp, shallow focus of the well-lit scene.
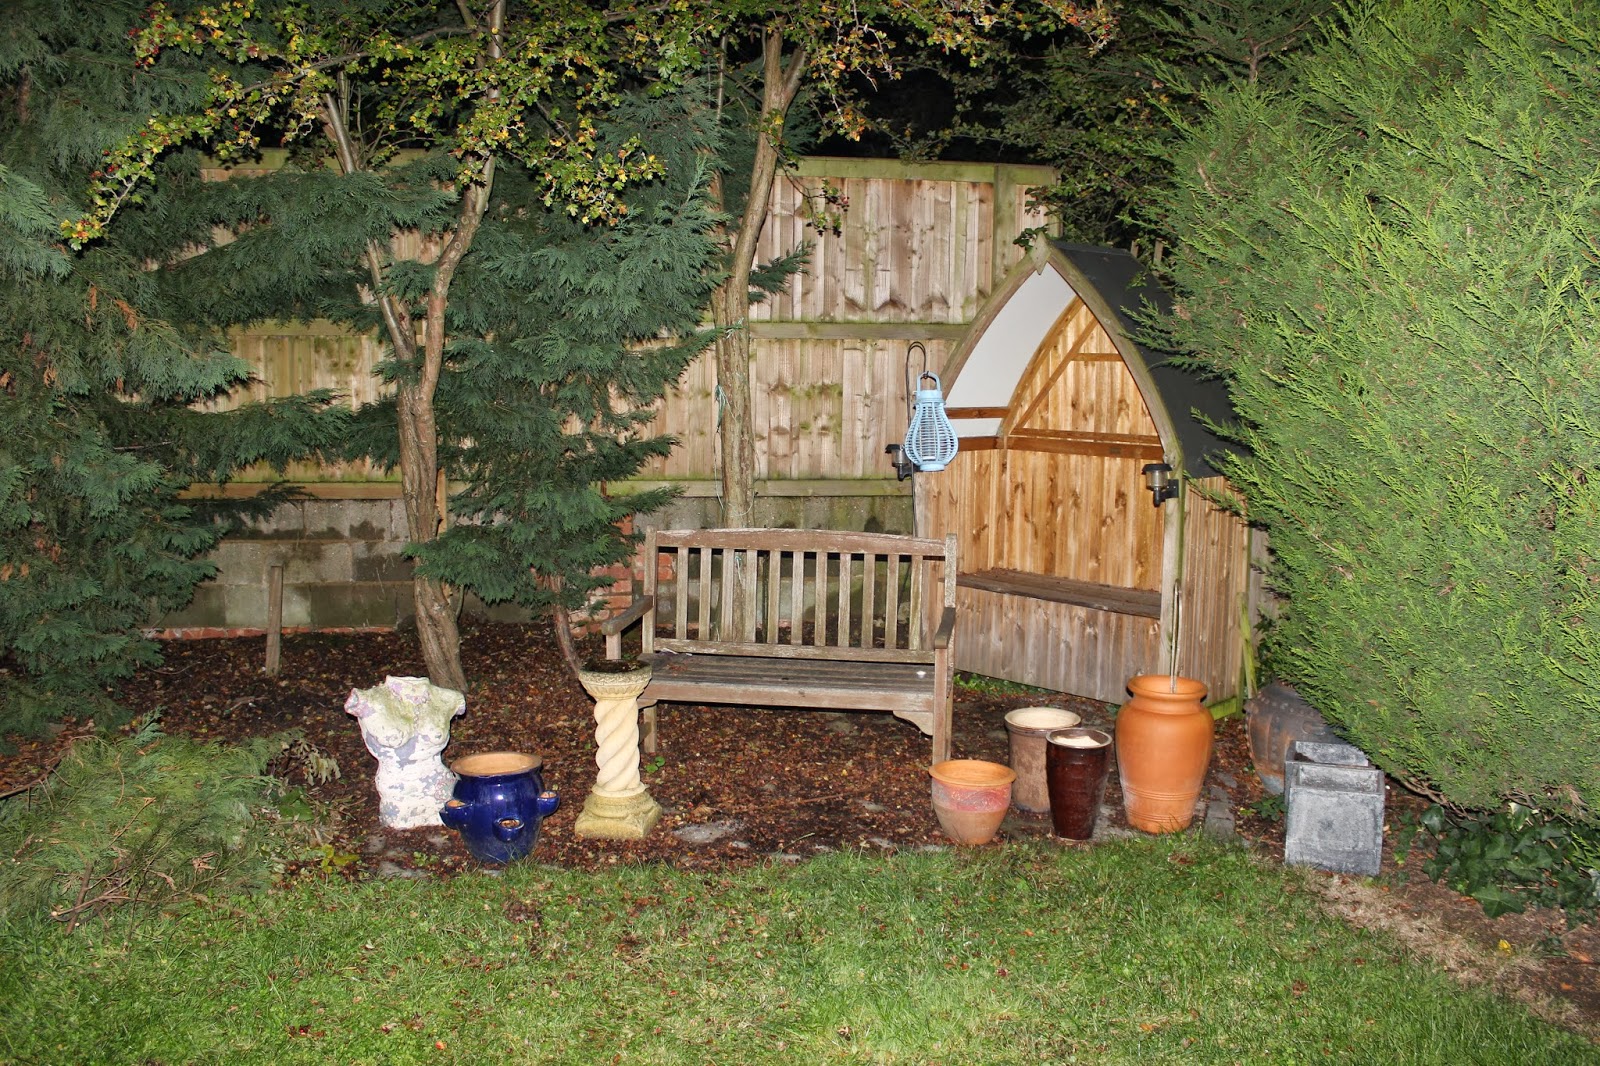
Location of the Garden Scene
I took photos of the different areas in the garden that I filmed footage. Some of the areas such as the bench and the lantern hut have not been used in my music video as the video quality was not good due to low aperture. The footage can be seen on my 'Lighting is Key' post where you can see the difference between the two different locations.


Wednesday, 23 October 2013
Make-up and Hair Styling for filming
 I decided to style Mollie's hair and do her make-up myself for the filming so I could create the exact same image I had in my head. I let her hair down natural and curled a few bits to give it some body but I wanted to emphasise the 'natural look'. Regarding her make-up; I didn't go crazy on the base as I didn't want her to look fake or too orange etc. So I did the right amount so that her skin looked almost flawless. I highlighted her eyebrows using a Benefit Eyebrow kit which lifts the face completely. Her eyes were where I put the most effort into looking good. Her eyelashes as really long so I just focused this by putting on some mascara. I then did liquid eye-liner along the eyelid to open her eyes and make them seem bigger. I then did some smokey eye-shadow effect by using white, grey and black eye-shadow. Finally, I used a nude coloured lipstick to keep in tune with the natural theme.
Monday, 21 October 2013
Audience Feedback for my New Idea
I spoke to 5 people in my media class and discussed my new idea with them and asked for some genera feedback on it. I am happy I did this as I was able to find out how much they preferred it compared to my old idea and also got lots really good suggestions on some good ways to shoot such as lens flares, fish eye lens and faster cuts.
Sunday, 20 October 2013
Risk Assessment
Here is a risk assessment of any possible problems that could occur and be unsafe. This will be very helpful when filming as I will be more aware of the possible risks which should mean they will be less likely to happen and it will be a much safer environment.
Saturday, 19 October 2013
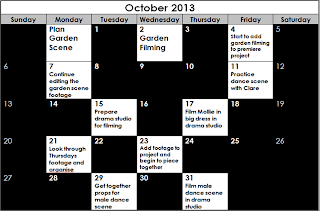
Filming and Editing Schedule
Here is a film and edit schedule of when I plan to film and edit my music video. The dates are accurate as I sat down with my main protagonist in my video and discussed days that she was free and matched them up to the days I was free too. Hopefully I won't have to re-film any sections and I finish according to my plan. This motivates me more to do it right the first time so I have to make sure my lighting and camera is set up exactly how I need it.


Friday, 18 October 2013
Production Post 17 - Light Streak Creation
 I wanted to create a light streak photo by using a slower shutter speed. I had researched online to find good tips on how to create an effective photo with ease. I went to Swakeleys Roundabout and changed the cameras shutter speed to around 13 seconds. I ended up with a few good shots but my favourite was the photo at the top
 < I opened it up in photoshop and increased the brightness and contrast and also altered the hue/saturation settings so that it had the bright, colourful look that is in the photo at the bottom.
 I love the effect is has and it ties in with my magazine advert as it caputures movement. It also adds another effect of colour and lights which is vital for my music video as the who video is going to be different forms of light and movement being shown such as Sparklers, Glow Sticks, Chinese Lanterns, Fairy Lights and car Time Lapses.
Thursday, 17 October 2013
Animatic
Animatics are used to create a sketch version of your video and it allowed me to experiment with how long to hold each shot for and what was too long/too short. This was very helpful when editing all my footage as I had a basic rough guideline to follow and adapt.
Storyboard for Revised Idea
Here is my storyboard for my idea alterations. I have sketched a rough copy of each shot I want to include and the order I want it to be. I am not sure if all of them will look effective and I may have to change some of them in order to make my video excel. I will experiment with different shots when I am on location and hopefully I will find some more interesting shots that work well with the locations, costumes and props used.


Production Post 16 - Digipak Designing

Wednesday, 16 October 2013
Change to my Idea - Reviewed Proposal
.jpeg)

As I have come quite far in the planning process of my music video, I have come to the conclusion that my video won't show the true theme I am going for. I want movement and freedom to flow through the magazine advert, digipak and also the video itself. This could not be achieved if I continued with the song I had originally - "You've Got the Love". I want to use the same artist but a more faster song so I could do some quicker cuts and also so the lyrics matches the fast movement and colourful image I am going for. Her song "Spectrum" is perfect and I have switched to this song. It has slow and fast parts to the song so I can do the slow dancing and also fast bits of footage too. The male actor I had originally planned to use is unavailable now so ill just be using the female, Mollie. New scenes will be added in where the male dancer would have been used. I filmed some footage tonight at Swakeleys Roundabout of the A-Road that runs beneath. I looked on my iPhone weather app to see what time the sun was setting and I filmed for about 45 minutes which I plan to speed up and hopefully see the sun set. I think this will be a great snippet of footage to add in my music video as it highlights specific movement of man-made materials - the cars, and the natural word - the sun. I also got some great photos of the moving cars by increasing the shutter speed to around 15 seconds. This allows all the movements in the space of 15 seconds to combine into one. I hope to be writing my film schedule soon so this will include all the new scenes I will be adding. I hope to use one of these images for my digipak back cover.
Tuesday, 15 October 2013
Digipak Sketch
Here is a rough sketch of what I am going to follow in order to create my Digipak and a guide for me to follow. This will save time and also increase organisation as I won't be doing it from a blank canvas and have an image in my mind of what I hope it to end up looking like. I will post a progress photo when I have completed a bit more of the digipak on InDesign.


Monday, 14 October 2013
Editing Software
Throughout the year I will be using a variety of different software - I have created a short description of the 4 main programs I will be using and what I will use them for.
Saturday, 12 October 2013
Friday, 11 October 2013
Production Post 15 - Idea Explanation and Feedback
Here is a presentation that I repeated to the class to try and gain some feedback from a group that are the majority of my target audience. I managed to explain my entire idea to them and also show my blog progress so far. This activity helped me in the way I could finally say out loud my idea and get other peoples opinions on it. Luckily enough they all liked my idea and gave me a few suggestions will will be posted on my blog at a later date where I can add in possible improvements.
Monday, 7 October 2013
Production Post 14 - Progress
I chose to make a Prezi this week to show my past work, present work and also what I hope to be working on in the next week coming.
Friday, 4 October 2013
Subscribe to:
Posts (Atom)